
macOS Tracking Users Activity ,Autoruns Application-Level Firewall and Forensic Insights
- 3 days ago
- 5 min read

When investigating a macOS system, understanding user accounts, logins, privilege escalations, and screen activity is crucial. Whether you're a forensic analyst, IT administrator, or cybersecurity enthusiast, knowing where to look can make all the difference.
-------------------------------------------------------------------------------------------------------------
🔍 Where Are User Accounts Stored?
User accounts and related settings are stored in plist files, which are the backbone of macOS configurations. Key locations include:
/private/var/db/dslocal/nodes/Default/users/.plist → Stores detailed user account info.
\Library\Preferences\com.apple.preferences.accounts.plist → Contains system-wide account preferences.\Library\Preferences\com.apple.loginwindow.plist → Tracks login window settings and user preferences.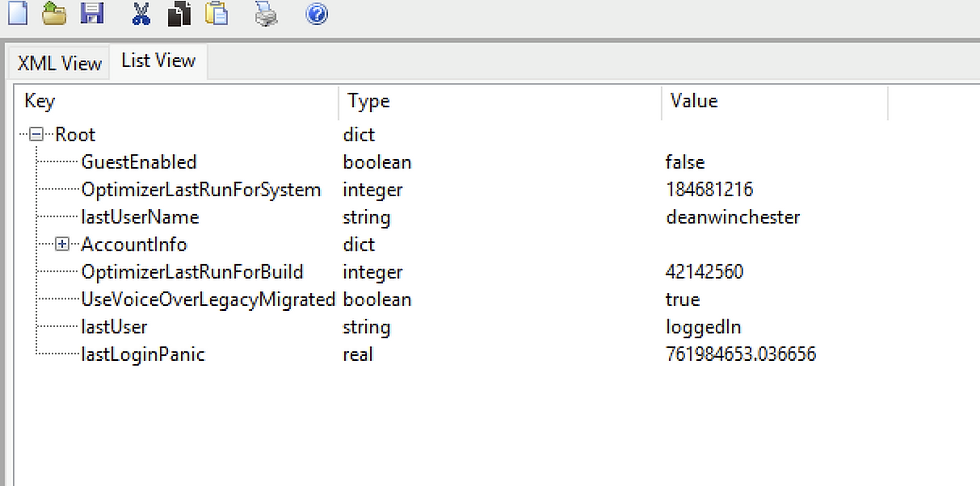
These files can help identify active, deleted, or even hidden user accounts on a system.
-------------------------------------------------------------------------------------------------------------
🏠 User Logins & Logouts: Who’s Been Using the System?
Tracking user sessions helps determine who has accessed the system and when. macOS users can log in through multiple methods:
Login Window → The standard graphical login.
Local Terminal → Using the built-in Terminal.
SSH → Remote access via OpenSSH.
Screen Sharing → Apple’s built-in VNC solution.
🔹 How to Find Login & Logout Events
Each login process is labeled USER_PROCESS, and logouts are marked DEAD_PROCESS.
These events are logged in system.log, Apple System Logs (ASL), and Unified Logs.

Examples:
GUI Login ((system.log and ASL…also BSM))
Feb 22 15:02:47 Mac loginwindow[95]: USER_PROCESS: 95 consoleTerminal Login((10.12 system.log and Unified))
Feb 22 15:29:37 Deans-Mac login[1860]: USER_PROCESS: 1860 ttys000SSH Login((10.12 system.log and Unified))
Feb 22 16:29:37 sshd [1831]: USER PROCESS: 842 ttys002Screen Sharing((Unified)
screensharingd: Authentication: SUCCEEDED :: User Name: deanwinchester :: Viewer Address: 192.168.1.1
By analyzing these logs, you can determine if an unauthorized user accessed the system remotely or via screen sharing.
-------------------------------------------------------------------------------------------------------------
🔓 macOS Screen Unlock Events
Even if a user is already logged in, it’s useful to track whether the screen was locked or unlocked. This can indicate when someone was actively using the system.
🔹 Find Screen Lock & Unlock Events
Use the following commands:
log show --predicate 'eventMessage contains "com.apple.sessionagent.screenIs"'
Locked Screen: com.apple.sessionagent.screenIsLocked
Unlocked Screen: com.apple.sessionagent.screenIsUnlocked

🔹 How Was the System Unlocked?
macOS logs the method used to unlock the screen:
Regular Password: Verifying using PAM configuration screensaver
Touch ID: Using localAuthentication hints
Apple Watch Auto Unlock: Using continuity hints
Tracking these logs helps confirm whether the legitimate user accessed the system or if someone bypassed authentication.
Note
While knowing if the screen is locked or unlocked is good, sometimes you may want to know how a macOS system was unlocked. We can use below query:
log show --predicate 'eventMessage contains "LWScreenLockAuthentication" and (eventMessage contains "| Verifying” or eventMessage contains "| Using")'
Regular Password:
• “Verifying using PAM configuration screensaver”
TouchID:
• “Using localAuthentication hints”
• “Using hint-provided username"
• “Verifying using PAM configuration screensaver_la”
Auto Unlock with Apple Watch:
• “Using continuity hints”
• “Using hint-provided username ”
• “Verifying using PAM configuration screensaver_aks”
-------------------------------------------------------------------------------------------------------------
🔥 Privilege Escalation: sudo & su Commands
Privilege escalation is a key indicator of potential misuse or malicious activity. The sudo and su commands allow users to execute root-level actions.
🔹 How to Detect Privilege Escalation
Use these commands to filter logs:
log show --predicate '(process == "su" or process == "sudo") and eventMessage contains "tty"'

🔹 What to Look For
Terminal Window Used
Current Directory
User Account Performing the Action
Command Executed
--------------------------------------------------------------------------------------------------------------------
Ever wondered why some applications launch automatically when you start your Mac?
What Are Autoruns?
Autoruns are mechanisms that allow applications and services to start automatically when you boot up your Mac or log in. While legitimate applications use these to enhance user experience (like iCloud syncing or antivirus tools), malicious software can exploit them to maintain persistence on your machine.
Common Autorun Locations on macOS
1. Login Items (macOS 10.13+)
Login Items are programs that launch when a user logs into the system via the graphical interface (GUI). These can be managed through System Preferences > Users & Groups > Login Items, but not all of them are visible there.
Some are stored in system files, making them harder to detect.
📂 Where to find them?
~/Library/Application Support/com.apple.backgroundtaskmanagementagent/backgrounditems.btm (User)<application>.app/Contents/Library/LoginItems/
💡 Did you know? Login Items are similar to Windows
HKEY_CURRENT_USER\Software\Microsoft\Windows\CurrentVersion\Run registry key!
2. Launch Agents (For Users)
Launch Agents are background processes that start when a user logs in. These can interact with the user session and sometimes have a graphical interface.
📂 Where to find them?
/System/Library/LaunchAgents/

/Library/LaunchAgents/

~/Library/LaunchAgents/

🚨 Red Flag: If you find unusual or unknown files in these directories, they could be signs of malware!
3. Launch Daemons (For System-Wide Services)
Launch Daemons are similar to Launch Agents but run at the system level, meaning they start before any user logs in and do not interact directly with the user.
📂 Where to find them?
/System/Library/LaunchDaemons/

/Library/LaunchDaemons/

💡 Fun Fact: Apple’s periodic maintenance scripts, which clean logs and optimize system performance, run using Launch Daemons!
-------------------------------------------------------------------------------------------------------------------------
How Attackers Exploit Autoruns
Malware authors love using autoruns because they allow persistent infections. Some common techniques include:
Placing malicious files in LaunchAgents or LaunchDaemons.
Using hidden login items that don’t appear in System Preferences.
Modifying existing system files to automatically execute malware.
🔎 How to Detect Suspicious Autoruns?
One of the best tools to inspect autoruns on macOS is KnockKnock by Objective-See.
It scans your system for persistent software, helping you identify unwanted or malicious programs.


-----------------------------------------------------------------------------------------------------------------------------
Application-Level Firewall (ALF): Your First Line of Defense
Unlike traditional firewalls that manage network traffic at the packet level, macOS uses an Application-Level Firewall (ALF) to control inbound connections for specific applications.
ALF determines which apps can receive incoming connections based on their identity.
How to Access and Configure ALF
Go to System Settings: Navigate to System Preferences > Security & Privacy > Firewall.
Enable the Firewall: If it’s not turned on, click Turn On Firewall.
Customize Firewall Options: Click on Firewall Options to fine-tune the settings.

Here, you’ll see:
Allow signed software – Lets macOS automatically allow incoming connections for trusted applications.
Enable Stealth Mode – Prevents your device from responding to network probes like ping requests, making it less detectable online.
Manually Configure App Access – Choose which applications can or cannot accept incoming connections.
Under the Hood: ALF Configuration File
For those who like to dig deeper, ALF’s settings are stored in a property list file located at:
/Library/Preferences/com.apple.alf.plist
Here are some key parameters:
globalstate: 1 = Firewall enabled, 0 = Firewall disabled
allowsignedenabled: 1 = Allow signed software, 0 = Block all by default
stealthenabled: 1 = Stealth mode on, 0 = Stealth mode off
If you’re a power user, you can tweak these settings manually using the plutil command in Terminal.
-----------------------------------------------------------------------------------------------------------------------------
Final Thoughts
macOS hides a wealth of forensic. Whether you're a security professional, a digital forensic analyst, or just a power user, understanding these artifacts can give you a deeper grasp of what’s happening under the hood. 🚀
Comments